Bingo Gold Cash Tutorial 2026: A Screen-by-Screen Walkthrough of Every 90-Second Game
Author: “Zenith Games Editorial” Author_url: “https://www.zenithgames.com/about/”
You downloaded the app. You opened it. You see a lobby full of rooms, a cash balance at zero, a Gems counter you do not understand, and four icons in the corner that look like they might be important.
Most “how to play” guides stop at “tap the numbers fast.” That is like teaching someone to drive by saying “press the gas pedal.” Technically correct. Practically useless when the light turns green and you stall.
This Bingo Gold Cash tutorial is different. It breaks down every screen you will encounter and every second of the 90-second game into micro-phases with specific actions, decisions, and scoring opportunities. By the end, you will know exactly what each UI element does, what to do at second 0 versus second 45 versus second 87, and why the difference between 100-point daubs and 140-point daubs is the difference between losing and cashing.
If you need the broader onboarding path (download, registration, first deposit), our Bingo Gold Cash beginner guide covers that. This tutorial assumes you can open the app and navigate to a room — and focuses entirely on what happens next.
Table of Contents
- Screen Anatomy: The Lobby
- Screen Anatomy: The Game Screen
- The 90-Second Game Timeline
- Power-Up Decision Trees
- Pattern Recognition Training
- Scoring Math: Why Every Millisecond Matters
- Common Interface Mistakes
- From Tutorial to Strategy
- Frequently Asked Questions
Screen Anatomy: The Lobby
When you open BGC, you land on the lobby. Here is every element on screen and what it does.

Top Bar
| Element | Location | What It Shows |
| Cash Balance | Top-left, green | Your withdrawable real-money balance. Starts at $0. Increases when you win cash rooms. Decreases when you enter paid rooms. |
| Gems Balance | Top-left, blue | In-game currency. Earned from free rooms and daily activities. Spent on Gems rooms. Converted to cash through the Gems-to-Bonus room. |
| Settings Gear | Top-right | Account settings, sound toggles, notification preferences. |
| Profile Icon | Top-right | Your player name, avatar, stats, and withdrawal access. |
Room List
The room list is the main scrollable area. Each room card displays:
| Card Element | What It Means |
| Room Name | Daily Match, Bingo Duel, Cash Party, etc. |
| Entry Fee | Free (ad-supported), $1.00, $2.50, $5.00, $10.00, or a Gems amount (20, 120, 1,500) |
| Player Capacity | How many players can join. Ranges from 2 (Bingo Duel) to 100 (Bonus Video). |
| Prize Distribution | How many top finishers get paid and how much. Tap the room card to see the full prize table. |
| Join Button | Taps to enter the room. For free rooms, you watch an ad first. For paid rooms, the entry fee is deducted from your cash balance. |
| Player Count | Shows how many players are currently in the room (e.g., “3/7” means 3 of 7 slots filled). |
Room Categories
| Category | Rooms | Purpose |
| Free Rooms | Bonus Video, Gems Video | Zero-risk practice and earning. Ad-supported. |
| Cash Rooms | Daily Match, Bingo Duel, Bingo Match, Cash Party, Cash Skies | Real-money entry, real-money prizes. |
| Gems Rooms | Gems Battle, Big Gems, Gems to Bonus | Spend Gems to enter, win Gems or cash. |
Tutorial tip: Start with the Bonus Video Room. It is free, 100 players compete, and the top 80% win something. You will experience the full 90-second game flow without risking a cent. Play 5-10 rounds there before entering any paid room.
Screen Anatomy: The Game Screen
When you join a room and the countdown reaches zero, you transition to the game screen. This is where everything happens. Here is every element, catalogued.
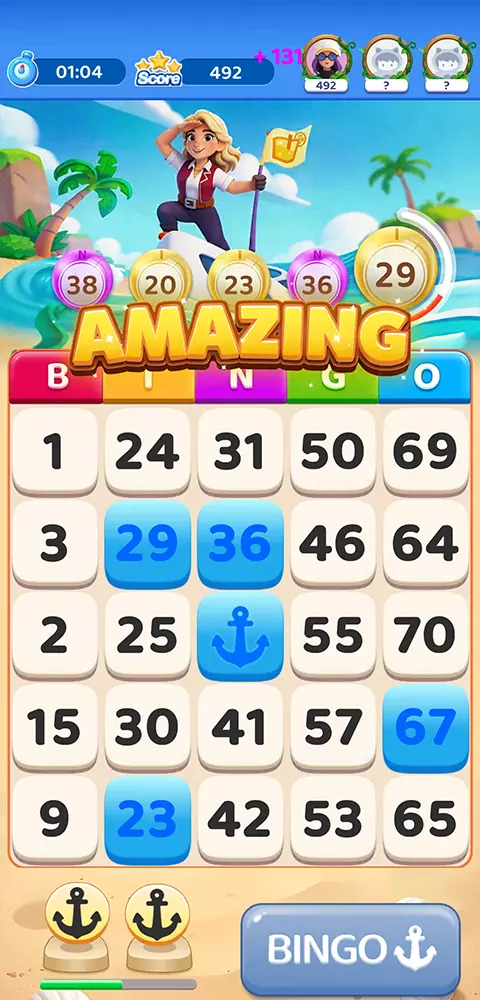
The Board
| Element | Location | Function |
| 5×5 Grid | Center of screen | 24 numbered squares plus a FREE space in the center (row 3, column 3). Letters B-I-N-G-O label the five columns. |
| B Column | Leftmost | Numbers 1-15 |
| I Column | Second | Numbers 16-30 |
| N Column | Center | Numbers 31-45 (center square is FREE) |
| G Column | Fourth | Numbers 46-60 |
| O Column | Rightmost | Numbers 61-75 |
| FREE Space | Center | Pre-marked. Counts toward any pattern that passes through the center. |
| Pattern Overlay | Translucent | Highlights the pattern(s) you are closest to completing. Lights up as you progress. |
The Ball Display
| Element | Location | Function |
| Current Ball | Center-top, large | The number currently being called. Appears for approximately 1-2 seconds before the next ball is drawn. |
| Ball History | Small strip below current ball | Shows the last 3-5 called numbers, in case you missed one. |
| Ball Counter | Corner of display | Shows how many balls have been called out of 75 total. |
The HUD (Heads-Up Display)
| Element | Location | Function |
| Timer | Top-center | Countdown from 90 seconds. Turns red in the final 15 seconds. |
| Your Score | Top-left or top-right | Updates in real-time as you daub and score BINGOs. |
| Leaderboard | Side panel or top strip | Shows all players’ current scores, updating live. Your position is highlighted. |
| Pattern Indicator | Below the board | Shows which of the four patterns you are closest to completing (Horizontal, Vertical, Diagonal, Four Corners). |
Power-Up Area
| Element | Location | Function |
| Power-Up Slots | Bottom of screen, 3 slots | Shows your equipped power-ups. Maximum 3 held at once. When a new power-up is earned, it replaces the oldest one if all slots are full. |
| Booster Gauge | Fills as you daub accurately | Each accurate daub fills the gauge. When full, you earn a power-up (added to your slots). Error daubs do not fill the gauge. |
| Activation Tap | Tap the power-up icon | Manually triggers the power-up. Some activate instantly (Wild Daub), others create a window (Double Score). |
Scoring Feedback
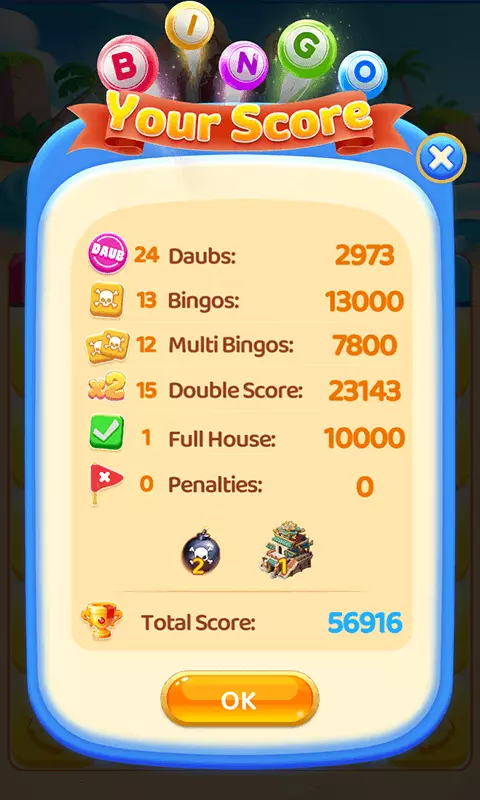
| Element | What It Shows |
| Daub Point Pop-up | A small “+100” or “+140” appears at the daubed square, showing how many points you earned for that tap. |
| BINGO Flash | When you complete a pattern, the completed line flashes and a “BINGO!” animation plays. 1,000 points are added to your score. |
| Multi-BINGO Indicator | If you complete multiple patterns in quick succession, a multiplier counter appears (x2, x3, etc.). |
| Error Indicator | If you tap a wrong number, a “-25” appears in red. If you call BINGO on an incomplete pattern, “-100” flashes. |
The 90-Second Game Timeline
This is the core of the tutorial. A BGC game lasts exactly 90 seconds. Here is what happens, second by second, broken into seven micro-phases.
Phase 1: Pre-Game (T-minus 5 to T-0)
What happens: The room fills with players. You see their avatars appear along the top of the screen. A countdown begins: 3, 2, 1, GO.
What you should do:
- Take a breath. Look at your board. Identify which numbers are in each of the four pattern paths you care about most.
- Check your power-up slots. Confirm what you have equipped.
- Glance at the player count. If the room is not full, fewer competitors means a higher chance of placing.
Common mistake: Rushing to tap before the game starts. There is nothing to tap yet. Use these 5 seconds to orient.
Phase 2: Opening Burst (T-0 to T-15)
What happens: The first 8-12 balls are called rapidly. The Booster Gauge begins filling. No power-ups have been earned yet (the gauge needs several accurate daubs to fill).
What you should do:
- Daub every called number as fast as possible. This is the phase where your daub speed sets the baseline for your score.
- Focus on accuracy first, speed second. An error daub costs -25 points, which takes 2-3 fast daubs to recover.
- Do not look at the leaderboard yet. It is too early to matter and will only distract you.
Scoring at this phase: If 10 balls are called and you daub all 10 at 140 points each, you have 1,400 points. If you daub at 100 points each, you have 1,000 points. That 400-point gap — established in the first 15 seconds — is difficult to close later.
Phase 3: First Power-Up Window (T-15 to T-30)
What happens: The Booster Gauge fills after approximately 8-12 accurate daubs. Your first power-up appears in a slot. Balls continue to be called at roughly the same rate.
What you should do:
- If Wild Daub: Activate it immediately. It auto-daubs a random unmarked number, which saves you a tap and keeps your rhythm. This is the safest power-up to use early.
- If Pick-A-Ball: Save it. Do not activate yet. Wait until you have 3-4 numbers that could complete a BINGO pattern, then use Pick-A-Ball to daub the one that completes the line.
- If Double Score: Save it. This is your highest-value power-up. Activate it when you have 4-5 unmarked numbers on the board — that way, the double-score window covers the most daubs possible.
- If Bonus Time: Activate it immediately. Extra seconds mean more balls called, which means more daubing opportunities for everyone — but if you are faster than average, you benefit more.
Key decision: By T-30, you should have activated or planned the use of your first power-up. Holding a power-up too long wastes the slot — when the gauge fills again, the new power-up replaces the oldest one.
Phase 4: Mid-Game BINGO Window (T-30 to T-50)
What happens: By now, 20-30 balls have been called. Your board has 10-15 marked numbers. This is when most players complete their first BINGO pattern. The leaderboard starts to separate — fast daubers pull ahead, slow daubers fall behind.
What you should do:
- Scan your board for near-complete patterns. The Pattern Indicator helps, but train yourself to see them without it.
- If you are close to a BINGO (one number away), use Pick-A-Ball to grab the completing number. A BINGO is worth 1,000 points — far more than any single daub.
- If you have Double Score saved, this is the window to activate it. You should have 4-6 unmarked numbers, and the double-score window will cover your highest-density daubing period.
- After your first BINGO, immediately look for the next pattern. Multi-BINGO multipliers stack, and two BINGOs within 5 seconds of each other can yield 2,000+ bonus points.
Scoring at this phase: A player who completes two BINGOs in this window (2,000 points) plus 15 daubs at 130 points each (1,950 points) has 3,950 points from this phase alone. A player who completes zero BINGOs and daubs at 100 points each has 1,500. The gap is now insurmountable without a Full House.
Phase 5: Second Power-Up Window (T-50 to T-65)
What happens: The Booster Gauge fills a second time. Your second power-up appears. By now, 30-40 balls have been called. The board is 50-60% marked. Unmarked numbers are becoming sparse, which means each called ball is more likely to be on your board.
What you should do:
- If you have not used Double Score yet, use it now. The remaining unmarked numbers are concentrated, and the double-score window will cover them efficiently.
- If you get Wild Daub as your second power-up, activate it immediately — every auto-daub at this stage is valuable because the unmarked numbers are harder to spot visually.
- Look for diagonal patterns. Diagonals are the most commonly missed pattern because they require crossing the entire board visually. Check both diagonals every 3-4 balls.
- If you are close to a Full House (all 24 numbers marked), prioritize daubing accuracy over speed. A Full House is worth 10,000 points — the single highest scoring event in the game.
Phase 6: Endgame Sprint (T-65 to T-85)
What happens: The timer turns red. 40-55 balls have been called. The board is 70-85% marked. Balls are being called at the same rate, but fewer of them are on your board. Every daub matters more. The leaderboard is largely settled, but the middle ranks (positions 3-6 in a 7-9 player room) are still fluid.
What you should do:
- If you have Bonus Time, it should already be active. If not and you get it as a third power-up, activate immediately.
- Focus exclusively on the board. Do not look at the leaderboard. The 2 seconds you spend checking your rank could cost you a 140-point daub.
- If you are one number away from a BINGO, watch the Ball Display with full attention. When the completing number appears, daub it instantly.
- Error avoidance becomes critical here. An error daub (-25) at T-80 costs you more relative to the field than at T-20, because there are fewer daubing opportunities left to recover.
Phase 7: Final Countdown (T-85 to T-90)
What happens: The last 5 seconds. 1-3 more balls may be called. The timer hits zero. The game freezes.
What you should do:
- Daub any remaining called numbers as fast as physically possible.
- If you have a power-up that can complete a BINGO (Pick-A-Ball), use it now — there is no reason to save it.
- Do not call BINGO manually if you are unsure. An Error BINGO costs -100 points, which could drop you from 3rd to 5th place.
At T-90: The results screen appears.
Results Screen
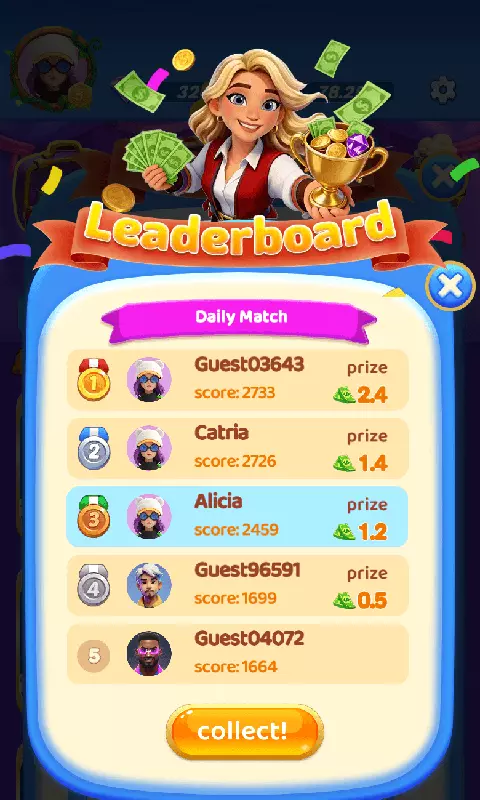
| Element | What It Shows |
| Your Rank | Your finishing position (e.g., 3rd of 7) |
| Your Score | Final point total |
| Prize | Cash or Gems won (if you placed in the money) |
| Breakdown | Daub points, BINGO bonuses, power-up points, penalties |
| Play Again | Quick-rejoin the same room type |
| Return to Lobby | Go back to the room list |
Power-Up Decision Trees
Power-up timing is the single biggest separator between average and top-tier players. Here is a decision tree for each power-up type.
Wild Daub
Why: Wild Daub auto-daubs a random unmarked number. There is no benefit to saving it — the number it daubs is random regardless of when you activate it. Holding it only risks losing the slot to the next power-up.
Pick-A-Ball
Why: Pick-A-Ball lets you choose which number to daub. Its highest value is completing a BINGO pattern (1,000 points). Its lowest value is daubing a random number early (140 points). The decision tree prioritizes BINGO completion.
Double Score
Why: Double Score doubles all daub points for a short window. The more daubs you perform during that window, the higher the return. Activating it when you have 4-5 unmarked numbers maximizes the number of double-scored daubs.
Bonus Time
Why: Bonus Time adds seconds to the game clock. More time means more balls called, which means more daubing opportunities. Since you are (presumably) faster than average, more daubing opportunities benefit you disproportionately. There is no strategic reason to delay.
Pattern Recognition Training
BGC has exactly four pattern types. Recognizing them instantly is a skill that develops with practice. Here is a training framework.
The Four Patterns
| Pattern | Count on Board | Difficulty to Spot |
| Horizontal Line | 5 possible (one per row) | Easy — scan left to right |
| Vertical Line | 5 possible (one per column) | Easy — scan top to bottom |
| Diagonal Line | 2 possible (top-left to bottom-right, top-right to bottom-left) | Medium — requires cross-board visual sweep |
| Four Corners | 1 possible (corners only) | Hard — corners are visually isolated from the center |
Training Drill
- Before each game: Identify which horizontal row is closest to completion. This is your primary BINGO target.
- After each daub: Glance at the Pattern Indicator. It shows which patterns you are closest to completing.
- Every 5 balls: Scan both diagonals. These are the most commonly missed patterns because they require looking across the entire board, not just at the most recently daubed area.
- Every 10 balls: Check all four corners. Four Corners is worth the same 1,000 points as any other BINGO, but it is the hardest to spot because the corners are far apart visually.
- After your first BINGO: Immediately identify the next-closest pattern. Multi-BINGO multipliers can double or triple your bonus.
The Multi-BINGO Gambit
The highest-scoring play in BGC is completing multiple BINGO patterns in rapid succession. Here is how:
- Reach a state where you are one number away from two different patterns simultaneously (e.g., one number from a horizontal line and one number from a vertical line).
- Wait for one of the completing numbers to be called. Daub it. BINGO #1 (1,000 points).
- If the second completing number is called within 5 seconds, daub it. BINGO #2 with multiplier (2,000+ points).
- If you have Pick-A-Ball, use it to daub the second completing number immediately after BINGO #1.
This requires board awareness and pattern pre-identification. It is an advanced technique, but the scoring payoff is enormous. For deeper pattern strategy, see our Bingo Gold Cash beginner guide which covers pattern prioritization.
Scoring Math: Why Every Millisecond Matters
Understanding the scoring system at a granular level is what separates players who improve from players who plateau.
Daub Point Range: 100-140
Every daub is worth between 100 and 140 points. The exact value depends on how quickly you tap after the number appears on the Ball Display.
| Reaction Time | Points | Classification |
| Under 1 seconds | 130+ | Amazing daub |
| 1.0-1.5 seconds | 120-130 | Great daub |
| 1.5-2.0 seconds | 110-120 | Good daub |
| Over 3 seconds | 100 | Slow daub |
The Math
In a 90-second game, approximately 45-60 balls are called (roughly one every 1.5-2 seconds). Of those, about 30-40 will be on your board.
Scenario A (Perfect dauber): 35 daubs at 140 points = 4,900 daub points + 2 BINGOs (2,000) = 6,900 total.
Scenario B (Average dauber): 35 daubs at 115 points = 4,025 daub points + 2 BINGOs (2,000) = 6,025 total.
Scenario C (Slow dauber): 30 daubs at 100 points = 3,000 daub points + 1 BINGO (1,000) = 4,000 total.
The difference between Scenario A and Scenario C is 2,900 points — nearly 50% more. And that difference comes entirely from daub speed, not luck, not card selection, not power-up luck.
Error Penalties
| Error Type | Penalty | Recovery Cost |
| Error Daub (tapping wrong number) | -25 points | Requires 1 fast daub (140) to net +115 |
| Error BINGO (calling BINGO on incomplete pattern) | -100 points | Requires 1 fast daub (140) to net +40 |
Error daubs are the silent score-killers. Three error daubs in a game cost you 75 points — which is more than half a BINGO bonus. The solution is simple: look at the Ball Display, confirm the number, then daub. The 0.2 seconds you spend confirming is worth far more than the -25 you save.
Common Interface Mistakes
Mistake 1: Watching the Leaderboard
The leaderboard updates in real-time and is hypnotic. Watching it costs you 0.5-1.0 seconds of reaction time per glance, which drops your daub points from 140 to 110-120. Over 35 daubs, that is 700-1,050 lost points.
Fix: Check the leaderboard once at T-45 (mid-game) to gauge your position. Otherwise, ignore it.
Mistake 2: Holding Power-Ups Too Long
Players save power-ups for “the perfect moment” — and then the Booster Gauge fills again, replacing the saved power-up with a new one. You lose the saved power-up entirely.
Fix: Follow the decision trees in the Power-Up section above. Wild Daub and Bonus Time should always be activated immediately. Pick-A-Ball and Double Score have defined activation windows — use them within those windows or lose them.
Mistake 3: Daubing Without Looking
In the rush to be fast, players tap numbers that are close to the called number but not exact. B-7 gets tapped when B-9 was called. This is an error daub (-25 points) and it does not mark the correct number.
Fix: Train your eyes to read the Ball Display first, then scan the correct column. The B column is always on the left. If the ball says “B-12,” scan only the leftmost column. This is faster than scanning the entire board and eliminates most error daubs.
Mistake 4: Missing Diagonal BINGOs
Horizontal and vertical patterns are easy to spot because they follow natural eye movement. Diagonals require crossing the board corner-to-corner, which most players do not do naturally.
Fix: Every 5 balls, deliberately trace both diagonals with your eyes. Top-left to bottom-right. Then top-right to bottom-left. This takes 1 second and catches BINGOs that would otherwise be missed until much later.
Mistake 5: Forgetting the FREE Space
The center square is always pre-marked. It counts toward any pattern that passes through the center: the third horizontal line, the third vertical line, and both diagonals. Players sometimes forget this and wait for a number that is already “daubed.”
Fix: Before each game, mentally note that the center is FREE. Any pattern through the center only needs 4 numbers, not 5.
From Tutorial to Strategy
This tutorial covers the mechanics. The next step is strategy — not just how to play, but how to win consistently.
| If You Want to Learn… | Read This |
| How to choose the right room for your skill level | Our bingo strategy guide covers room selection EV |
| How to maximize daub speed and accuracy | Our bingo daub speed guide breaks down the 100-140 point range |
| How power-up timing affects your win rate | Our bingo apps power-up strategy guide |
| How rake affects your long-term earnings | Our bingo rake EV analysis |
| How to transition from free rooms to paid rooms | Our free bingo rooms strategy guide |
The transition from “I know how to play” to “I consistently place in the money” takes approximately 50-100 games. The first 10 games are about interface familiarity. The next 20-30 are about daub speed development. The remaining 20-60 are about power-up timing and pattern recognition under pressure.
Do not rush into high-stakes rooms. The skill gap between a 50-game player and a 200-game player is real, and the $10 Cash Skies room is populated by players who have played hundreds of games. Start with free rooms, move to Daily Match ($1 entry) when you consistently place in the top 40% of free rooms, and only enter higher-stakes rooms when you have a positive net ROI at the $1 level.
Frequently Asked Questions
How long does a Bingo Gold Cash game last?
Every BGC game lasts exactly 90 seconds. There is a 5-second pre-game countdown before the 90 seconds begin. After the game ends, the results screen appears immediately. The total time from joining a room to seeing results is approximately 100-105 seconds.
How many numbers are called in one game?
Approximately 45-60 numbers are called during the 90 seconds, depending on the ball call rate (roughly one every 1.5-2 seconds). Not all called numbers will be on your board — a standard 75-ball board has 24 numbered squares plus the FREE space, so at most 24 of the 75 possible numbers are relevant to you.
What is the highest possible score in one game?
The theoretical maximum involves daubing all 24 numbers at 140 points each (3,360), completing all possible BINGO patterns with multipliers (approximately 12,000+ with Multi-BINGO stacking), achieving a Full House (10,000), and activating Double Score during the densest daubing window. In practice, top scores in competitive rooms range from 8,000-15,000 points depending on how many BINGOs are completed and how many multipliers stack.
Do all players see the same numbers?
Yes. This is the core of BGC’s skill-based design. Every player in a given room sees the same 5×5 board, the same ball sequence, and the same power-up sequence. The only variable is player skill — how fast and accurately each player daubs. There is no card selection, no lucky draw, no RNG advantage. For the architectural reasoning behind this, our bingo card guide explains the identical-board model in detail.
What happens if I tap the wrong number?
You receive a -25 point penalty (Error Daub). The correct number remains unmarked on your board. Three error daubs in a game cost you 75 points — equivalent to half a BINGO bonus. Avoid them by confirming the called number before tapping.
Can I practice without spending money?
Yes. The Bonus Video Room and Gems Video Room are free to enter (ad-supported). You play the full 90-second game against real opponents and can win real cash (up to $5 in Bonus Video) or Gems (up to 200 in Gems Video). These rooms are the ideal practice environment. Play 10-20 free rounds before entering any paid room.
How do I know which power-ups to equip?
The default recommendation for new players is Wild Daub, Pick-A-Ball, and Double Score. Wild Daub provides a safety net (auto-daubs numbers you might miss), Pick-A-Ball gives you control (choose which number to daub), and Double Score provides the highest scoring ceiling. Once you are comfortable, experiment with replacing Wild Daub or Pick-A-Ball with Bonus Time for a more aggressive playstyle.
⬇️ Download Bingo Gold Cash — Free on iOS & Android
Related Link: